 Ordinami.it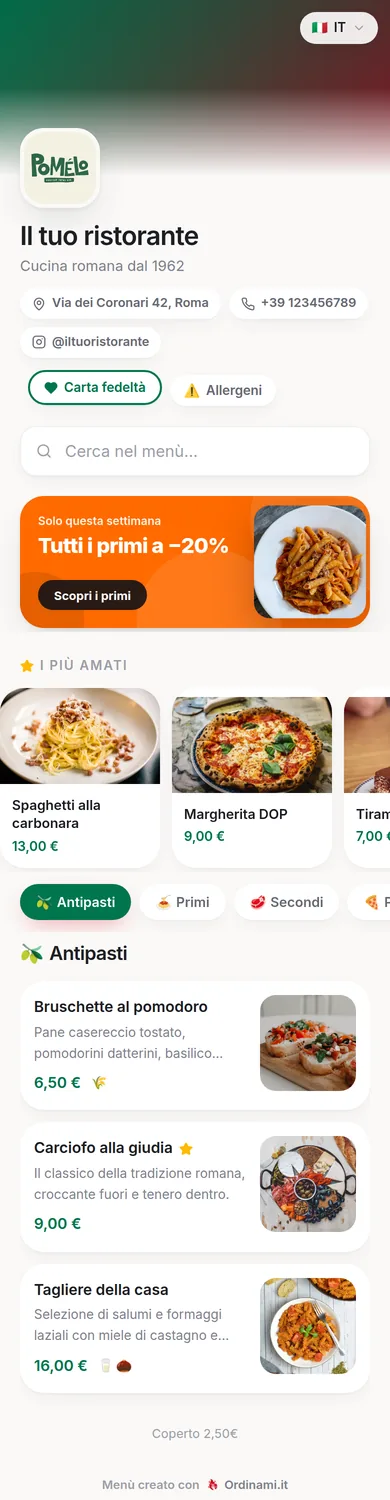
Creating a digital menu doesn't require a website, a designer or technical skills: all you need is the menu you already use and a guided process that does the work for you. With Ordinami.it you go from the paper menu to the QR code on the table in one evening. Here you'll find every step in the right order, with tips so you won't have to redo anything later.
What to prepare before you start
Before opening the dashboard, get three things together. The first is your current menu, re-read with a critical eye: uploading it is the perfect chance to drop the dishes nobody orders, merge duplicate categories and double-check prices against your till system rather than from memory. The second is the allergen map: go through the menu item by item with whoever runs the kitchen and note, for each dish, which of the 14 allergens under EU/UK rules it contains — doing it now costs half an hour, doing it later costs a full revision.
The third is photos, if you have them: photos of your ten most important dishes are enough, shot with your phone near a window. They're not compulsory and you can add them at your leisure over the following weeks, but photographed dishes sell better, so it's worth starting with your signature dishes at least.
Step 1: sign up and set up your venue
Signing up on Ordinami.it takes a few minutes: you create your account, enter the venue name, your logo if you have one, and the basic information customers will see at the top of the menu. No credit card is needed to start building the menu and see the result on your phone.
At this stage you also set the general options: currency, the look of the menu and the languages, if your plan includes them. A practical tip: don't waste time polishing every aesthetic detail now. The goal of the first session is to have the complete, correct menu online; style tweaks come later, once you see the real result on your phone and understand what's worth fixing. Chasing perfection on the first pass is why so many digital menus stay half-finished.
Step 2: create categories in the right order
Categories are the skeleton of the menu and must be created before the dishes: starters, pasta, mains, pizzas, desserts, drinks — whatever your customers expect to find. Two rules make the menu more effective. First: the order matters, because the categories at the top get far more attention; put the ones you want to sell most at the top, not necessarily the traditional ones. Second: a category shouldn't exceed 10-12 items, otherwise the customer scrolls without reading — if you have thirty pizzas, split them into classics and specials.
On a digital menu, categories have one more advantage over paper: you can reorder or hide them whenever you like. The bar that puts breakfast at the top in the morning and aperitivo at 6pm uses the same logic as the supermarket that moves products around: what's seen first sells.
Step 3: enter dishes, prices, photos and allergens
For each dish you fill in four fields, and each deserves a minimum of care:
- Name: clear, with no internal abbreviations. The name of a traditional dish can stay in Italian even in the translated versions.
- Description: one or two lines with the main ingredients, the preparation and the detail that makes the dish yours. No empty adjectives like "delicious": origin and technique sell more.
- Price: double-checked, with a final figure consistent with your venue's positioning: round prices for mid-range and upscale venues, .90 endings for value formats.
- Allergens: you select the ones present in the dish from the predefined list; they'll appear next to the item, in the translated languages too.
With the list prepared in advance, a menu of 40-60 items takes one to two hours to upload. You don't need to finish everything in one session: the menu can be published when it's complete and refined over the following days.
Step 4: generate the QR code and put it on your tables
When the menu is ready, the QR code has already been generated: you download it from the dashboard in high resolution, ready for print. Before producing table tents for every table, do the test too many people skip: print a single trial copy, put it on the worst-lit table in the venue and scan it in the evening with two different phones. If the menu opens in a couple of seconds, you're ready.
For the final print, three rules apply: a minimum size of 3x3 centimetres for scanning from the table, a white margin around the code, and a rigid or laminated support that stands up to glasses and cleaning. Beyond the tables, a QR in the window and one at the counter catch people who want a peek at the menu before sitting down. All the details on materials, sizes and placement are in the QR code menu guide. And remember: the code never changes, so you only do this print run once.
After publishing: the menu needs to be kept alive
The value of a digital menu shows after it goes online, in daily use. A sold-out dish gets hidden in ten seconds from your phone, instead of leaving the waiter to collect refusals; Saturday's off-menu special gets added on the fly; the seasonal change is prepared calmly and switched on the right day, with no print shop in between. These are one-minute gestures that on paper were impossible or expensive, and that's where the subscription pays for itself.
A healthy maintenance rhythm looks like this: every service, hide the sold-out items; every week, update specials and off-menu dishes; every season, review dishes and prices with the sales data in front of you. And in the first few weeks, spend ten minutes improving one category at a time: one more photo, one rewritten description. Within a month the menu is not only digital, but noticeably better than the paper one you started from.
Frequently asked questions
How long does it take to create a digital menu?
The basic structure takes about ten minutes; a full menu of 40-60 items with photos and allergens takes one to two hours the first time.
Do I need technical skills or a designer?
No: the process is guided, the menu layout is ready-made and the QR is generated automatically. If you can use WhatsApp, you can use the dashboard.
Can I create the menu in several languages?
Yes: with the Ordinami.it MEDIO plan the menu is available in 6 languages, and the translations stay aligned with every change to your dishes.
Can I edit the menu after publishing it?
Always and without limits: prices, dishes, photos and categories can be edited from the dashboard even mid-service, and the changes go live in real time.
Does the QR code need redoing when I change the menu?
No: the QR stays identical forever; only the page content changes. The table tents are printed once.